First Day 17/11/17
The studio is conveniently near my University so I was able to locate it quickly. The hours are 9-5 Mon-Fri until 22nd Dec. My job involved exclusively working on animating various objects in Maya and occasionally modeling and animating in After Effects. Current project involved working for BBC Bitesize which is a free online study support resource for students in United Kingdom. Enter Yes is working on biology in GCSE section creating animated videos with a voice over to help the students prepare for their exams. Videos include allusive scenarios where common household items interact with one another helping students memorise important biological meaning without technicalities. The idea is to create a memorable scene/interaction which helps your brain to picture the scenario when presented with the question in exams.
Upon arriving I met a small team of people along with two other people from my course so it was nice already knowing someone. Ross Morrison wasn’t there yet so I modeled a kids swimming armband to help the team before I officially got a task. He is a producer within the company and the person I kept in contact with through the emails.


Most models have to be kept with a lower polygon count where possible as some machines don’t have powerful graphic cards and enough RAM in their systems.
After meeting with Ross and given a brief explanation of what the company does and what my role will be. I almost exclusively only helped out in animating with some modeling work where needed. My first official task was to animate two candles melting with the words ‘complex’ and ‘simple’ engraved to them where simple carbohydrates burn quickly and complex take much longer. This section was in nutrition and food. It was the first time I learned how to use blend shapes where Hannah Turkington, my unofficial mentor and a former Ulster University student gave me tasks and helped me throughout the whole placement period.
In all of these finished animations, there’s a corresponding voice over which explains what is happening. In the end we decided to remove the engraved ‘complex’ and ‘simple’ words that were part of the candle mesh as they looked a little odd with blend shapes so it will be added in After Effects during post production. I learned that in order to have blend shapes work, you must always have the same amount of vertices in the mesh. To keep track of them you select Display > Heads Up Display > Poly Count.
20/11/17
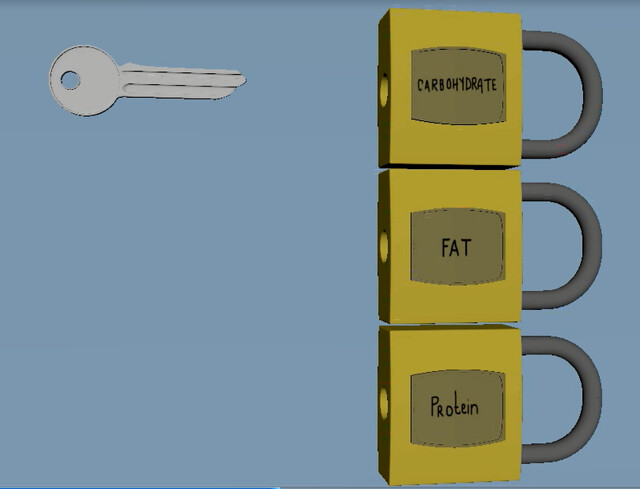
Today I worked on the same script in nutrition and food section but on a different scene. It involved 3 industrial containers labeled ‘fat’, ‘protein’, and ‘carbs’ which opens corresponding to the voice over. Protein container has an engine inside of it which sputters and stops working until an oil can fixes it and it’s working again.
I messed up the oil can size and a lot of things had to be tweaked. This shows how constant communication is vital.
21/11/17
Still on the same script, I had to do a fusilli pasta scene with a milk carton where pasta had to link up to form a long chain of sugars and where the milk had to pop open and pour sugar cubes to follow the same theme. Pasta had to be remodeled by Hannah as previous version didn’t link up properly making the ‘link’ in the chain choppy. In this studio, scenes are constantly passed around so a person who, for example, specialises in dynamics will take over the more complicated parts of the scene when needed.
I couldn’t use blend shapes for milk as it had a different polygon count so I attempted to make it appear more snappy instead as if it popped open and dynamic sugar cubes could be added later.
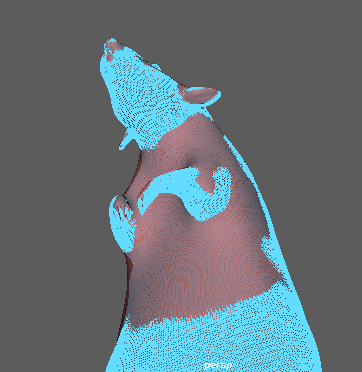
Exercise and the circulatory system is a full script I had to complete by myself which had five different scenes in it. A bellow representing heart rate had to increase in speed. Hannah showed me how to create an alembic cache where you can control the speed of the animation without having to manually move keyframes around.
It is also a great way to treat some heavier scenes if you no longer wish to add any changes to your final animation; kind of like baking a scene.
A second scene involved a Newton’s cradle where I attempted both hand animating and dynamics. Animating honestly looked too fake and there wasn’t enough flow to it.
Ross agreed and asked if I’m comfortable trying dynamics. I have attemped them when sending my test video and with a decent tutorial by Edge CGI on YouTube, it wasn’t as difficult to recreate. I pinned them with nail constraints mimicking the actual threads that hold the balls and later parented the strings so they matched the constraint curves (so they would render out as normal). However, as stated in the script, having one of the far right balls stop for a moment before having a dramatic swing meant that I couldn’t simply let the animation play through, as different speeds were needed to represent how heart beats when exercising. Alembic cache was no luck but I figured that keyframing gravity itself helped me achieve the effect I was looking for.
Dynamics are unpredictable at times too so it’s best to play out the animation several times to get the desired effect as sometimes the balls didn’t react as expected.
22/11/17
This third scene was one of the most challenging and frustrating yet. I modeled a scalextric car controller for this scene also.


The script stated that the cars had to race together in the scene and abruptly stop with their tires melting, then the controllers would ‘pump’ them back to drive even faster with embers gushing from their tires. I remembered how I animated along a curve with motion paths in 1st year and decided to try that approach since the cars are racing around the track. Firstly I added some grooves in the path and learned how to extrude a curve from edges rather than drawing it manually for the cars to follow using polygon edges to a curve method. Animating this way worked well for the first circle but it was extremely fidgety when keyframed with various speeds and no looping available. I couldn’t make the cars come to a complete stop when they were supposed to die down. Alembic cache couldn’t save me either so I decided to keep the cars going almost a full circle until they stopped as the voice over indicates. I then started a new curve with new car geometry copied (hid the first round of cars and lined them up) and let them go again. With both animations cached I was able to control and exaggerate the speed for the final race.
The scene turned out really well but it did involve a lot of problem solving on my part which took a couple of days to fully complete.
27/11/17
After receiving feedback on the script above, I just had increase the speed of the bellow and it was all good to go. I started on a new script which explains how DNA works. The client wanted something like Mr. Robot or The Matrix inspired; binary numbers acting as a DNA sequence.
This fan-made video displays a possible approach to introduce this DNA section acting as a title card with a rain code. I approached the first scene in After Effects which I only know the basics of so I needed to look up some tutorials. I mashed the information from two tutorials by CardusBox and Flat Pack FX to create my own version of the binary code.
It turned out nicely for a first draft though the client will decide if that is what they are looking for.
28/11/17
The following scene involved a bowl of fusilli pasta and a fork picking it up to examine up close representing the coding strand and amino acid. It was a simple animation with parenting a piece of pasta with the fork and animating a couple of faces for it to look a little more dynamic.
Following scene involves a row of slot machines that get the code ‘right’ and flash while the camera pans out.
Basic and simple animation!
29/11/17
Another scene had to be completed in After Effects in sex, hormones and characteristics script. I had to create a sonar which displays a male and female icons on the screen getting closer to each other corresponding with the VO. The scene represents changing hormones of the sexes causing attraction to one another. I used 3 tutorials to help me create a sonar radar from scratch; for base, HUD elements and numbers. Clients prefer simple and straight to the point visuals so I decided to keep it simple and recognisable.
Using some of these tips it was easy to come up with a realistic sonar base to start off.
I decided to use a simple 360 constant gradient for radar sweeps as the main focus should be male/female icons as targets.
This tutorial helped me to create a number range around the sonar which represents degrees.
After tweaking swiping, colours of the targets and timing of fade, I was able to come up with this final result.
My next task was to take a genetic conditions script which involves 6 scenes and must be completed for Monday evening.
- A pair of ripped jeans representing faulty genes which fly off the screen into a rack full of mother’s and father’s jeans.
- Two piles of paired and unpaired socks representing Down’s Syndrome with leftover sock as a chromosome which fails to get 23 even pairs as there is an extra sock.
- A pie with constantly flowing filling that doesn’t clot/stop representing Haemophilia and a bruising pie which represents human skin.
- Party whistle representing faulty lungs from having Cystic Fibrosis.
- Hourglass with chunky food that doesn’t let it pass through the hole after flipping representing impaired digestion.
- A brain and spine still which represents Huntington’s disease which affects nerve cells in the brain causing it to eventually shut down.
1/12/17
To tackle the jeans scene I wasn’t sure on how to approach the ripping so I began looking into tutorials on tearable nCloth. The idea was to have the ball hidden for the final render so the tear would appear corresponding to the voice-over.
The ball was set as a rigid body and I triangulated the nCloth beforehand. I still couldn’t get the desired look even after increasing polygon count and playing with various settings. We decided to change up the script and have detailed rips in the scene already with panning camera movement to make it more interesting. This saved a lot of time and the visuals fit just fine without on-screen ripping. Still having trouble with animating the jeans with nCloth, I decided to rig the jeans with simple parent/constraint and animate them manually.
4/12/17
For Monday morning I finished up animating the rest of the rack’s movement. The sign on top will be textured to day ‘Mom’s and Dad’s’ with mother’s side taking up 70% of the sign space representing how much they influence their offspring’s genes.
For my second scene, I duplicated exactly 47 socks (23 pairs+1 leftover) in a pile to display the amount of chromosomes a person with Down’s Syndrome has. I used nCloth to drop the socks in a realistic pile then duplicating and freezing their position. With each disappearance of 2 socks 1 pile appears on the right hand side leaving one behind at the end of the VO.
In the beginning I attempted to use Bifröst in Maya to create a realistic fluid simulation. Using a SnapLaunch tutorial I learned about its sensitivity to scale and how numbers influence its appearance. Playing around with it was fun but I soon found that the machines in the studio can’t handle that simulation and it was difficult to even playblast the results.
The whole process took a really long time so I had to come up with an easier solution for the following day.
5/12/17
There was no point in playing around with it further as time was getting tight for me to finish the whole script for Thursday evening so I decided to use the good ol’ Blend Shapes instead.
It was quick, effective and got the point across so there was no need to overcomplicate the process.
For the 4th party horn scene I had to remodel the paper tube extension as the original model was only rolled up geometry. Using non-linear bend deformer technique, I was able to animate it being measly filled with air and then manually animating the faces where the whistle filled with air fully to make it more believable.
Cystic Fibrosis 4th scene is linked together with the 5th hourglass scene. I attempted to convert pieces of food in the hourglass to active rigid bodies and the glass itself to a passive one in hopes for it to move about without going through the glass when flipped. Machines were once again overloaded as there were too many pieces of food with a high polycount so I decided to leave this scene and complete it at home after having some time to think of an approach. I tackled the final scene which had to be completed in After Effects so I would at least have one more scene completed by the end of the day.
The idea was to create a motorway with a city in the distance which looks a lot like the brain and spine. In post production there would be appropriate sound effects of a car driving and allegedly crashing; shutting down the entire city to match the VO.
At home I decided to group some bits of food an manually animate their movement as it is a short scene and it was easy to get away with less detail. The hourglass then floats off the screen as stated in the script.
6/12/17
After receiving feedback this morning for the above script I had to make the following changes.
- Scene 1: Change the camera angle so you’re looking from the top down, remove the complicated rigged scene and pull the trousers off of the screen fast instead of seeing them float away. Mom’s side of the rack is the only one with movement.
- Scene 2: Change the camera movement and timing. Add a visible ‘bounce’ when the piles of socks appear to give it move life. Have the leftover sock fall onto the new pile rather than lay beside it.
- Scene 3: Have the blend shape constantly increase/flow on top of the pie and only stop at the very end of the voice-over.
- Scene 4: Add another party whistle that works correctly so there’s a comparison between the two.
- Scene 5: The scene does not look good compares to previous ones. Hand over the scene to Danilo or Hannah to have a dynamic glass smash instead of it floating off.
- Scene 6: After Effects don’t match to previous 3D work so the scene will have to be completed in Maya to add more dimension. Hand over to Rebecca.
now the camera angle is correct, rigged scene is removed and mom’s side of the rack is the only one with movement.
There is more dynamic camera movement making the scene more interesting. Piles of socks have a slight bounce once they appear and timing issues are fixed. I used nCloth to get a nice landing on a new pile.
Timing of the blend shapes was adjusted and now it moves smoothly throughout the whole animation only stopping at the end.
A second whistle was added for comparison. Blend shapes distorted the paper tube so I had to keyframe the non-linear bend deformer as well as keyframing the faces manually for the best look.
7/12/17
I got another round of feedback after completing yesterday’s critique. Scene 2 and scene 3 are good to go leaving 1 and 4 to be tweaked a little more.
Trousers just needed to disappear a bit quicker than before so there’s barely any time to react.
Party whistles took a while to get right but we eventually got there after a total of 4 more changes. First attempt was to have the defective whistle fully extend like a normal working one but look much less inflated and weaker. The working one must look ‘powerful’.
Then we decided it’s best not to fill it with air fully as it was difficult to see the main differences and remove the extra twitching from a normal working one.
After more feedback, Ross wanted the whistles to extend/contract at the same rate to show off the difference.
For the final attempt we decided to keep the correctly working one extended while the defective whistle tries to extend 3 different times but recoils after each attempt. This final version got approved.
8/12/17
Had to complete a title card for non-communicable diseases introducing the script. For this scene I had freedom to use whatever choice of software I wanted as long as the letters are jumbled up in the beginning and eventually spell out the words ‘Non-communicable diseases’. I decided to use Maya as previous After Effects attempt appeared too flat so I took no risks with this tight deadline.
It was fairly straight forward piece to complete as I simply animated the letters in various ways to make it more interesting and fun. Idea is to show how they’re out of place and jumbled hence non-communicable.
11/12/17
Today we were visited by a placement student Claire who is interested in 3D animation. I was in charge of showing her some of the work we do in the studio and explanations of basic concepts of 3D animation. She has some previous experience in 2D animation and showed me some of her work which was really impressive. After explaining some basics in Maya my next task was to do some fixes after receiving further feedback from BBC while Claire shadowed me. I picked up osmosis script this time which involved two simple scenes.
Previously in this scene there was no following of the raising with the camera, it was static shot and the client wanted more dynamic movement. I also had to make the scene cut shorter as previously it went onto 25 seconds rather than 15 with zero action. A new scene had to be introduced at 15 to match the VO. It was a simple fix of moving around keyframes which allowed me to explain to Claire what a graph editor was and how the axis work within this software.
Former version had only the small toys travel through the holes once and remained on the opposite side to the bigger blocks though the VO indicates that they can travel back and forth so the client wanted it to be clearer. Larger toy movement had to appear after 10 more seconds passed in the second scene with small toys moving continually until the very end where the voice-over indicates that both sides are equal. It was a finicky and time consuming task but easy in terms of difficulty in the actual animation. I showed the student how keyframes can be copied to cut corners and save time if she ever decides to pursue a 3D career.
Another piece of feedback was to remodel a key from vintage style to a Yale style instead to make it more modern.
This was a quick opportunity for me to show Claire how to model in Maya. Overall it was a nice experience to showcase my work and talk about the course and studio work to someone who is just dabbling into it. She seemed to enjoy her time and learned a lot of basics.
12/12/17
At this stage there was a lot of waiting around on feedback and constant changing and fixing of already existing scenes, changes that came through had to be applied by anyone who was available. I modeled a fancy cake server for one of the scenes that needed changes. Feedback for enzymes section also came through.
New key was replaced, words on locks were flipped from sideways so that the reader could make them out more easily and more dynamic camera movement which follows the key in action was added.
For this scene I tried to add more movement in the camera since it was previously completely static. I also fixed up some minor animation issues where some lego blocks didn’t properly connect to each other.
13/12/17
After receiving more feedback, the client wanted the DNA title card approached differently. ‘How does DNA work?’ title had to be omitted and the constant falling text is to be seen at all times without working any words. Ross suggested to add key words within the binary code just as the VO mentions them.
Using the same tutorials as before I managed to create a cool effect with jumbled words to mimic binary version alongside it. I just changed the colour of the words to white so it would stand out immediately as the voice-over mentions them. I also added a glow to the whole scene to make it seem more futuristic.
14/12/17
BBC provided us with further feedback on nutrition script. There were some changes in timing and the client wanted protein to be represented as an additional food rather than pointing at both steak and potato. No arrows in the final product; have food react to being mentioned instead.
There were also talks of replacing steak with something else to represent fat so Hannah showed me how to inflate mesh objects using nCloth and I also referenced back to a tutorial by Stuart Christensen which helped me with gravity and general inflation settings.
From ‘How DNA works’ scene we also received some feedback on the slot machine which I worked on earlier. In order to understand the scene more, it was decided that all of the slot machines will get the code wrong until the camera pans down to the final machine in the sequence showing the correct code followed by ‘winning’ sounds.
Sound-work and lights would have to be done in either After Effects or Nuke during post-production so it would be clear for the viewer which is the correct chain link.
15/12/17
Today we had to work quickly as after 2 o’clock 5 pizzas and copious amount of alcoholic beverages will be present in the studio for the staff party. I was presented with two tasks to complete before that deadline. First was a simple fix of making a mechanical arm from genetic engineering scene (the one I completed as a test in the beginning) come from the top of the screen rather than the bottom which only took a couple of minutes. Another task was a little more complicated as various people had different opinions of what the end result should look like. Ross suggested to have the crowbars come one after another like a domino effect instead of them laying on the floor completely static and then do one wiggle at the end rather than twice like done previously.
These crowbars were rigged with a lot of joints through them so the wiggle would appear smoother, I decided not to mess with the rig as it had a tendency to pop off of geometry. Instead I unlocked ‘rotate x’ in the attributes of the geometry and decided to animate keeping an equal distance of keyframes between each crowbar just in case an adjustment in speed would be needed. When crowbars stood up, joints were in their initial position which did not disturb the previously animated wave. Two different angles were done to see which one would flow better with previous scenes when editing them together for a client.
18/12/17
For the first portion of the day I had to completely redo the crowbar scene as other computers could not open the file due to high polygon count of the crowbars. It took only about an hour as I knew what to do without trial and error like yesterday.
Nutrition scene had to be tackled once more with the asked changes from the previous day. Ross decided to replace the steak with a slice of cake to represent fat and add an egg for protein. I found that using nCloth on a mesh with more than one geometry (even after combining it) does not work. Pieces of cake started to float off the screen and our goal was to simply inflate it. To work around this problem, I quickly modeled a similar slice with distinctive geometry to highlight differences between jam and sponge so texturing will be easier in the future. Cake still had to be high poly so nCloth application would be more believable.
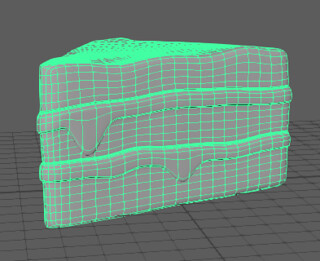
Hannah also showed me how to apply a surface shatter effect to the inflated cake as it was previously done with the steak once hydrogen and oxygen is mentioned in the VO. It has to pop!
All the changes have been applied with correct timing, food reacting to it being described, addition of and egg and floating cake.
19/12/17
Almost a full day was spent texturing various scenes to be sent off to clients to appear more pleasing. Global warming script also needed a quick fix as an old broccoli model was replaced. To highlight deforestation, I animated broccoli sprouts falling down one by one and quickly regenerating once reforestation comes up in the voice-over as a solution. Regrowth was a simple job of scaling sprouts in the scene and having them pop back in their full glory at the end of it.
20/12/17
Further revision on the crowbar scene was needed. The domino-like effect had to be removed as it takes too long to fully happen and the fluttering effect had to be softened as it appeared too aggressive in the previous version.
In order to get a softer wave we had to remove a good chunk of crowbars as it appeared to have an obvious unrealistic pattern. Ross also wanted a dramatic ‘whoosh’ and for the crowbars to return to their initial position by the end of the VO. I played with the graph editor and camera angle had to be changed for the desired effect to take place.
Non-communicable diseases script needed changes in two more scenes.
A simple turn on of the tap had to be animated with camera slowly panning out of the shot.
Previously this final scene had no camera movements and animations were mixed up and not corresponding the the voice over. I had to frame the shot with a pot which was being described. Further spreading of vines to represent cancerous tumors will; be completed in Nuke or After Effects in post production.
Final fix of the day was to remove dynamics from Jenga scene as BBC did not think it worked well with the overall look. They preferred if the two towers could remain intact with both of them wobbling instead. I put a simple bend tool through the geometry so it would be simple to keyframe the curvature value.
After further feedback I had to remove the momentum and simply have the donor tower slowly hit the recipient.
21/12/17
In defense mechanism script, it was a simple camera angle change. I also had to remove the ground where the spoon lands in a believable way as it was a cached animation. Previously we had a jelly that got changed to a pie after feedback so the new food had to align with the spoon’s motions.
DNA introduction video also had to be tweaked where all words apart from ‘enzymes’ and ‘proteins’ had to be removed.
Further texturing and camera work was done in various scenes to quicken up the pace for Hannah so she could edit all playblasts for the client.
22/12/17
This was my final day at the studio and in all honesty it was an amazing experience. I learned many tips and tricks in these 6 weeks from each and every person in the studio, got to work with paying clients and experienced a fixed schedule with tight deadlines. I would love to work with this company in the future and hope to stay in contact throughout final year.